Chargebee Integration (Only for Resellers to Setup Subscriptions for Their Customers)
Integrating Chargebee with your WhautoChat Reseller SaaS deployment provides advanced subscription management with support for multiple payment gateways. Chargebee acts as a unified billing platform that can work with various payment processors across different jurisdictions.
Why Integrate Chargebee?
- Support multiple payment gateways (Stripe, PayPal, Braintree, Authorize.Net, and more)
- Manage complex subscription billing scenarios
- Advanced revenue analytics and reporting
- Automated dunning management for failed payments
- Support for different tax jurisdictions
Prerequisites
Before you begin, ensure you have:
- A Chargebee account (test site for development, live site for production)
- At least one payment gateway configured in your Chargebee account
- Access to your backend server configuration
🔹 Before App Installation
Pre-Installation Checklist: Complete These Steps First
1. Chargebee Setup Guide (Reseller SaaS License)
Set up Chargebee integration for your Reseller SaaS using WhautoChat.
Step 0: Locate Configuration File
Go to the web-server.env file in the installation folder shared by our WhautoChat team.
You'll need to fill in the following:
#Chargebee Integration (Only for Resellers that want to use Chargebee instead of Stripe)
CHARGEBEE_SITE="your_chargebee_site"
CHARGEBEE_APIKEY="your_chargebee_apikey"
CHARGEBEE_WEBHOOK_USERNAME="your_chargebee_webhook_username"
CHARGEBEE_WEBHOOK_PASSWORD="your_chargebee_webhook_password"
Note: This integration is for Resellers who want to use Chargebee instead of Stripe. Do not enable both integrations at the same time unless your product explicitly supports dual providers.
Step 1: Create or log in to Chargebee
-
If you already have a Chargebee account, please log in to it.
-
If you don't have an account, sign up from Chargebee's site.
Step 2: Get your Chargebee Site ID
After logging in, look at the browser address bar. Your Chargebee store URL looks like:
https://whautochat-test.chargebee.com/
The <site-id> part (for example, whautochat-test) is what you must put in CHARGEBEE_SITE.
CHARGEBEE_SITE="whautochat-test"
Update the web-server.env file with this value.
Step 3: Configure Chargebee Essentials
Open Settings
- In your Chargebee dashboard, go to the Settings menu.
- Select Configure Chargebee from the submenu.
Set Up Billing Essentials
- Configure your Business Profile (company name, address, tax info, etc.).
- Review and update your billing rules.
- Connect and configure your payment gateways.
Set Up Customer-Facing Essentials (Important Setup)
- Scroll down to the Customer-Facing Essentials section.
- Here, you can customize your brand styles, customer emails, invoices, and checkout experience.
Required for Chargebee integration (Important Setup):
- Go to Checkout & Self-Serve Portal → Configuration tab.
- Set the Checkout option to Single Sign On API.
- Scroll further to the Self-Serve Portal section.
- Set the Self-Serve Portal option to Via Single Sign On API.
(You may enable or adjust other checkout/portal options as needed for your business.)
Note: This guide shows only the required configuration for the Reseller app Chargebee integration. You can complete additional setup later, such as Billing rules, Customer Data Privacy, Revenue Recovery, and other advanced options, based on your business needs.
Step 4: Create and copy a Full‑Access API key
- In Chargebee, go to: Settings → Configure Chargebee.
- Scroll to API Keys and Events → API Keys.
- Click + Add API Key.
- Choose the Full‑Access Key option and give it a meaningful name (e.g., "ABC Business API Key").
- Copy the generated API Key (it appears once). Paste it into:
CHARGEBEE_APIKEY="your_chargebee_apikey" - Save the
web-server.envfile.
Security note: Treat the API key like a password — store it in a secrets manager if possible.
Step 5: Choose webhook credentials (for Basic Auth)
Pick a username and a strong password (random string). These will be used to protect your webhook URL using HTTP Basic Auth.
Example:
CHARGEBEE_WEBHOOK_USERNAME="abcbusiness"
CHARGEBEE_WEBHOOK_PASSWORD="2AqYO0vP0M"
Store these values in web-server.env now. You will re‑use them when creating the webhook in Chargebee.
Why this is needed: WhautoChat expects the webhook to be protected by Basic Auth. This prevents unauthorized systems from posting to your endpoint.
Step 6: Save and validate your web-server.env file changes
Here's how your final configuration should look:
# Chargebee Integration
CHARGEBEE_SITE="whautochat-test"
CHARGEBEE_APIKEY="EAAJZCZA2wZA1cUBABAZCZA3UZBvE4fWQ4BbZA1ZCZAUZB"
CHARGEBEE_WEBHOOK_USERNAME="abcbusiness"
CHARGEBEE_WEBHOOK_PASSWORD="2AqYO0vP0M"
🔹 After App Installation
Post-Installation Configuration: Finalize Your Setup
2. Chargebee Webhook Configuration (Reseller SaaS License)
Important: You must set up the webhook from the Chargebee dashboard after the app is installed. If you skip this, Chargebee events will not reach WhautoChat.
Steps to add the webhook
- Log in to your Chargebee account.
- Go to Settings → Configure Chargebee → API Keys and Events → Webhooks.
- Click + Add Webhook.
- Fill the fields:
- Webhook Name: e.g., "ABC Business Server"
- Webhook URL:
https://yourserverdomain.com/chargebee/webhook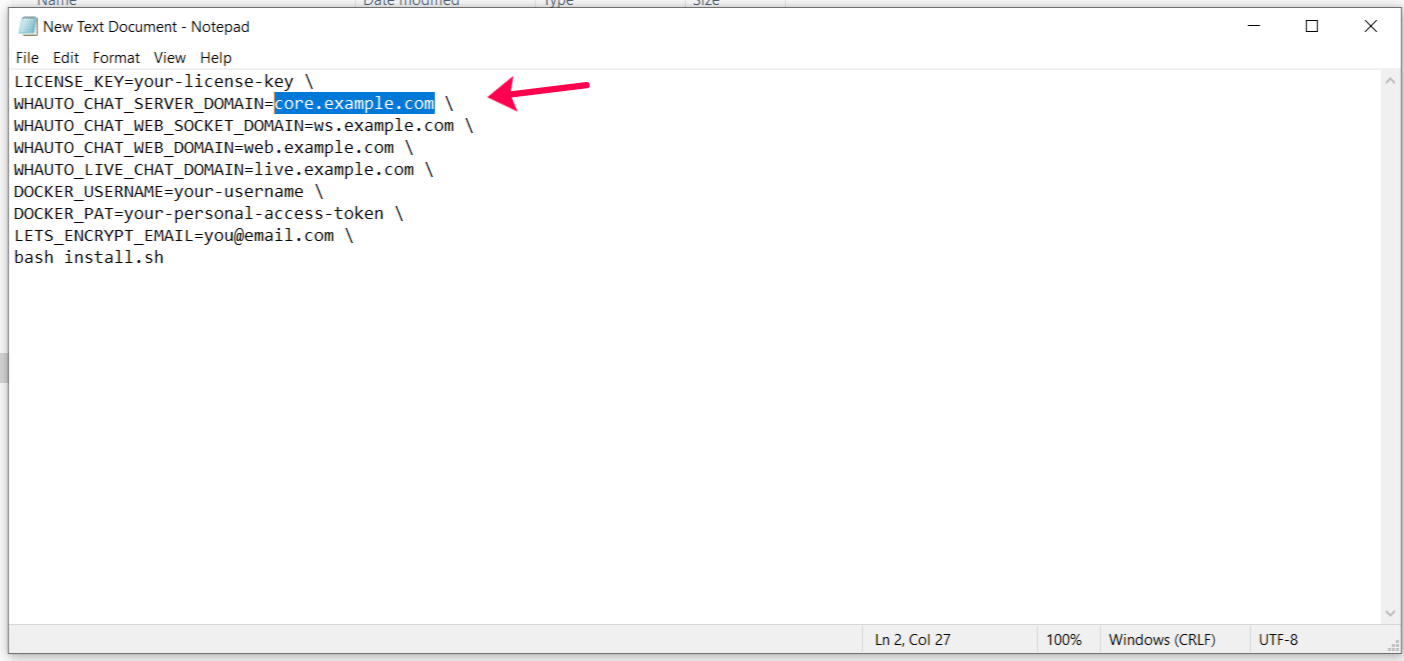 Example:
 https://core.example.com/chargebee/webhook - Protect webhook URL with basic authentication: Enable this option.
- Username: Use the exact
CHARGEBEE_WEBHOOK_USERNAMEfrom theweb-server.envfile. - Password: Use the exact
CHARGEBEE_WEBHOOK_PASSWORDfromweb-server.env.
- Username: Use the exact
- Events to select: (select all subscription events below)
- Subscription Created
- Subscription Created With Backdating
- Subscription Started
- Subscription Activated
- Subscription Activated With Backdating
- Subscription Changed
- Subscription Trial Extended
- Subscription Changed With Backdating
- Subscription Cancelled
- Subscription Cancelled With Backdating
- Subscription Reactivated
- Subscription Reactivated With Backdating
- Subscription Renewed
- Subscription Deleted
- Subscription Paused
- Subscription Resumed
- Payment Succeeded
- Payment Failed
- Enable the "Set this as primary" toggle
- Enable the "Exclude card information from webhook call" toggle
- Click Create to complete the Webhook configuration.
Create a test plan in your backend dashboard to check if it's replicating in your Chargebee account.
Troubleshooting
Webhook Events Not Received
- Verify your webhook URL is publicly accessible via HTTPS
- Check that your firewall allows incoming requests from Chargebee IPs
- Review webhook logs in Chargebee dashboard for delivery failures
API Authentication Errors
- Confirm your API key is correct and not expired
- Ensure you're using the correct site name
- Check that your API key has the necessary permissions
Payment Gateway Issues
- Verify each gateway is properly configured in Chargebee
- Check gateway-specific credentials and settings
- Review gateway status in Chargebee dashboard
Additional Resources
- Chargebee API Documentation
- Webhook Events Reference
- Payment Gateway Configuration
- Subscription Management Guide
Note: Chargebee integration is only required for Reseller deployments that need to manage customer subscriptions and payments. The multi-gateway support makes it ideal for businesses operating across multiple jurisdictions or requiring payment processor redundancy.
For further assistance, refer to Chargebee Support or the WhautoChat documentation.